CO 3713 DIGITAL COMMUNICATION
ASSOCIATE PROFESSOR WENDY ROUSSIN, MFA
wroussin@comm.msstate.edu
FILE MANAGEMENT and SITE MANAGEMENT
Managing Local and Remote Files
One of the biggest obstacles a beginning web designer can face is the organization of Local and Remote files. Local files reside on your computer/external hard drive/ flash drive and remote files reside on the server that hosts your web site. Ideally, these files are identical in both content and organization. Good organization means that the folder/directory structures should be as similar as possible. The terms folder and directory are interchangeable for the purpose of discussing web sites.
Most web servers utilize a folder or directory called “public_html” (Quotations are mine). Items placed into this folder are visible to anyone that knows your site address or searches for it.
Folders placed into the public_html directory are identified by a “/”
An example is: http://co3713-02.comm.msstate.edu/~netID/clientSite.
In the previous example http://co3713-02.comm.msstate.edu/~netID/clientSite:
- The host server is co3713-02.comm.msstate.edu
- The user is netID
- And clientSite is a folder placed into the public_html directory (or folder)
Sometimes the host server and the user are identical, like in http://www.cnn.com
NOTE: Modern web browsers allow the user to take short cuts, such as you typing in “cnn” and the browser automatically filling in the blanks to take you to http://www.cnn.com. This only works in the location bar of the browser. When designing/coding a site you must use the full web address starting with the http://.
NOTE: It is best to avoid long file names, spaces, and special characters. File servers that host web sites are much more stringent than your personal computer when it comes to naming conventions. It is best to limit file names to 8 characters or less and to only use letters, numbers, and underscores. Dashes are ok, but underscores are preferred. Never use back or forward slashes in a file name. In general, one would capitalize the first letter of the next word in lieu of a space.
Organization
Create a local version of your public_html folder stored on your internal HD or an external Flash drive. Name it: “web_local”. It is important that everything inside of this folder matches the structure inside of your public_html folder on your class web account.
You will need to create two additional folders inside of web_local:
- clientSite
- characterSite
Site Management via Dreamweaver
Select the location for your site as the local site in your web folder (web_local).
All files for this site should be located in the selected folder for proper site functionality.
In Dreamweaver →
- Site→ New Site (or Site→Manage Sites if you need to make changes after set-up)
- (Site Tab) Site Name: Name of your Site
- (Site Tab) Local Site Folder: Navigate to your site in your local web folder.
- Click Save
If you do not manage your site, it is possible that your links and images will not work when previewing your page. Another advantage to managing your site with Dreamweaver is that Dreamweaver will update pages in your site to reflect any changes, such as renaming or moving a file. Managing with Dreamweaver helps you maintain consistency between local and remote files and prevents many problems from occurring.
NOTE: If you are working on a multipage site (versus just a page at a time) it’s fairly common to complete the site ‘locally’ prior to upload since all editing and testing can be done prior to uploading and no one can “find” your unfinished site before you are ready. Generally, you would have all pages created with content and images prior to taking your site live. For the purposes of this class, make sure all pages for a multipage site assignment are updated and uploaded for all ‘PREVIEW’ or ‘IN PROGRESS” deadlines.
All files (html, images, pdfs, etc…) must be located in the chosen site folder. You might find it helpful to have a separate image folder nestled in your chosen site folder.
Linking to additional pages from within Dreamweaver:
Browse for local links in the Property Inspector box to insure the correct path. Or you can also use the Point to File ( ![]() ) to select local files. Just click on the icon and drag the arrow toward the file you wish to link to. Targets, etc… can then be set using the Property Inspector dialog box.
) to select local files. Just click on the icon and drag the arrow toward the file you wish to link to. Targets, etc… can then be set using the Property Inspector dialog box.
External links should be referenced with the full URL (http:// . . .)
When Ready to Upload Site:
Make sure you are connected to the Cisco AnyConnect VPN to connect to the server from an off-campus connection.
In Dreamweaver: Site→ Manage Site if you have not already set up your site
- Choose the Servers tab.
- Click the “+” in the bottom left
- Match the screen shot below (use your netID and password)
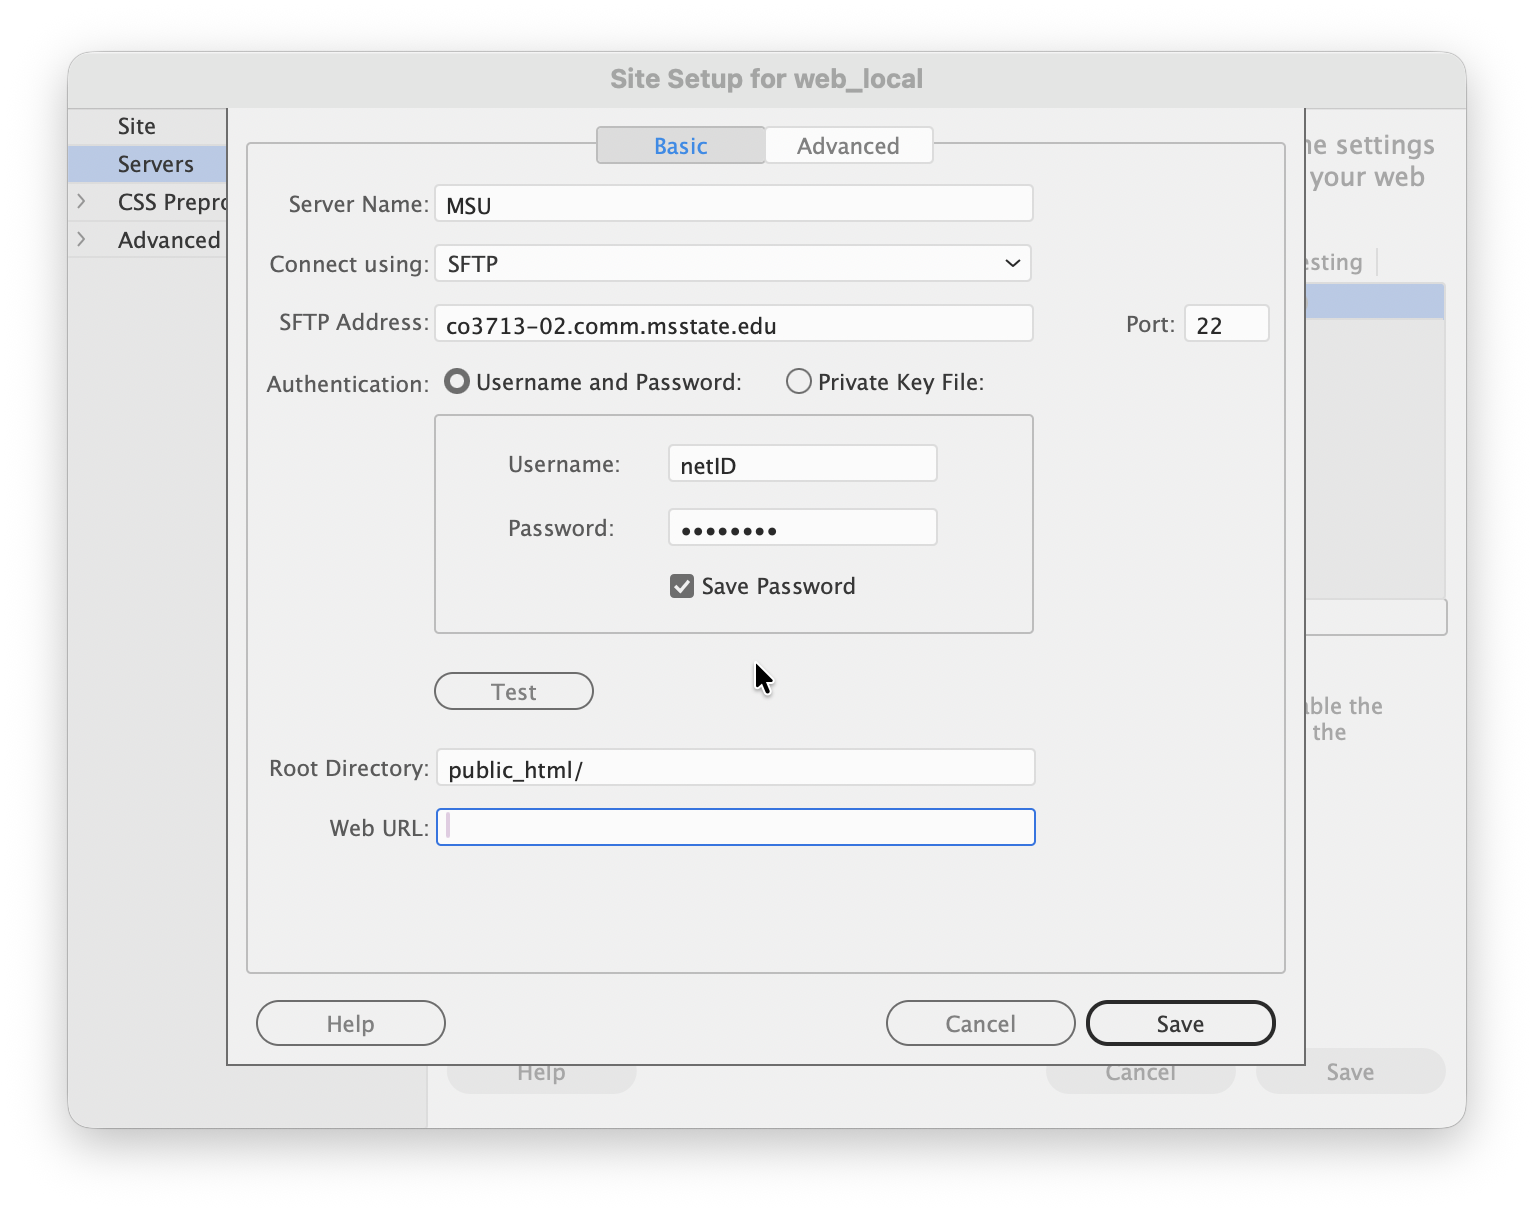
- Click Save when finished. It’s a good idea to TEST your connection.
- Use the “PUT” command from the Files Panel in Dreamweaver to select files to UPLOAD.
- View your page on a browser after the upload for a final check.
Section Site Location: http://co3713-02.comm.msstate.edu/~netID
(replace 'netID' after the ~ with your netID)
You may need to refresh the page if you’ve visited it recently.